Zucchini Flowers! The delicate yellow beauties of the zucchini plant.
My cooking-at-the-farm day at Green Door Gourmet with Arts Bellevue was a blast! One of the stand-outs was clipping zucchini flowers out in the farm.
Sylvia Ganier, Green Door Gourmet proprietor, gave us a farm tour and showed us how to choose and clip the flowers. A wonderful experience for all. Back in the kitchen, we cooked the flowers with this simple recipe and it was the hit of the menu!
For YEARS I passed by broccolini in the produce department. It had an imposter air about it. Not broccoli. Not broccoli rabe. Not baby broccoli. Not baby broccoli rabe. So what is it? How come it’s got an Italian “ini” at the end. It’s not Italian.
I found out it’s actually a hybrid between broccoli and Chinese broccoli. That got me interested.
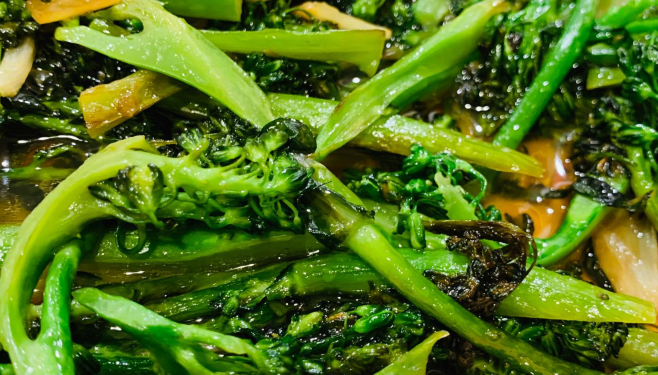
I bought some, took it home, trimmed it, and cooked it just following my own instincts. Similar, actually, to the way I cook broccoli rabe. But broccolini stems are a little denser, so are the florets and leaves — so I cooked it a little longer…
…and loved it! It has a milder, almost sweeter flavor compared to broccoli. And it’s not bitter like broccoli rabe. It’s a third “broccoli” with an assertive personality all its own. Welcome, broccolini, to my table. Try my recipe — easy!
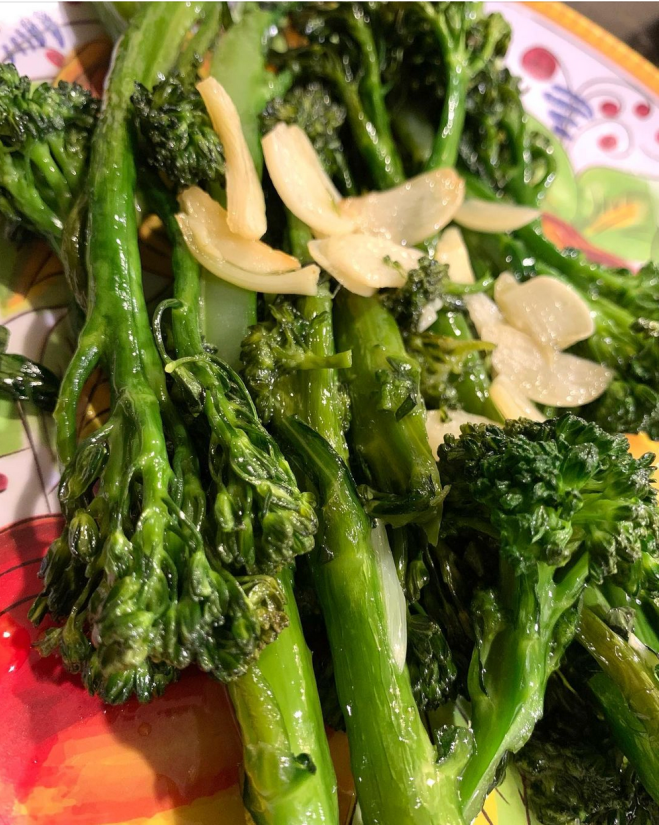
Sautéed Broccolini with Slivered Garlic (serves 4)
1 bunch broccolini
2 garlic cloves
Olive oil for sautéing
Salt & pepper to taste
Trim the ends of thick stems from broccolini, about 1-2 inches, and discard. Spilt the stalks lengthwise so they’re not too thick. Cut the tops into long-to-bite-sized pieces. Peel garlic and cut cloves into long slivers.
In a medium frying pan, heat 2 tablespoons olive oil. Add the broccolini, and stir to coat in oil and cook for 1-2 minutes at a lively saute. Add garlic, cook for 2 minutes. Add 1/4 cup water. Let broccolini steam-saute, lively, until tender, about 3-4 minutes. Season with salt & pepper.
Additions/alternatives: add some red pepper flakes if you’d like a little heat. Add some lemon zest for a citrus pop.
I had such a blast chatting recently with Andrew Gebby and Giovanni Franceschini on their Sharing the Flavor podcast. We jumped into the subject of Sicilian roots. Andrew’s grandfather came from Messina, and my paternal grandparents came from Ragusa– and maternal grandmother was from Palermo. Being second generation American sometimes feels like we just got here from a foreign world.
A few years ago I led a group of my cooking class students on a tour of Sicily, and we spent time in Ragusa. The people we met, the foods we ate, the places we were, and the air we breathed, were, to me, so familiar. Whatever my family brought back to NY, the traces of life lived in Sicily, all blended together for a grand meeting — Sicilian-American me embraced by origins of me.
San Giorgio in Ragusa
Of course, the biggest sensory connections happened with food. My dad was famous for his “scaccia.” I grew up eating this unusual rolled stuffed pizza lightly filled with tomato sauce, cacciocavallo cheese, and basil leaves. It was as familiar as pasta fagioli, but nowhere to be found at any Italian-American restaurant, or any Italian-American household I knew.
Dad’s Scaccia
On my first day in Ragusa, having coffee at a bar, I spotted a piece of scaccia in the panini showcase and blinked and blinked unsure what I was seeing. I ordered it immediately and on first bite was sent to the moon. Yes. This is my Dad’s scaccia. Here. Thousands of miles away. But not far, really, from his parents who walked these same Ragusane strade.
Scaccia at bar in Ragusa
These stories and more all come out in our podcast discussion deliciously focused on Sicily. Here’s the link: Sharing the Flavor …It’s a fun way to immerse in Sicilian experiences. All the dishes and recipes we talk about are at the bottom of this post. I hope so much you will try them out. Let me know how it goes. And by all means, contact me with any questions. Buon viaggio!
Dad’s Sicilian Scaccia 6 pieces
For the dough:
5 cups flour (all-purpose)
2 teaspoons salt
2 1/4 teaspoons yeast (1 package/envelope)
1 teaspoon sugar
1/4 cup olive oil, plus more to coat dough
1 egg, beaten
For the filling:
1 small onion, peeled and diced
olive oil for sautéing
1/4 cup white wine
28 ounces crushed tomatoes
salt & pepper to taste
1 lb. provolone cheese, cut into 1-inch thin slices (or caciacavallo if you can find it)
1 cup basil leaves
In the bowl of a stand mixer (or you can do this by hand) mix together the flour and salt. In a medium bowl or large measuring cup combine 1 1/2 cups warm water (tepid, not too hot, not too cool) with the yeast and the sugar. In a small bowl or cup mix the egg with the olive oil. Make a well in the center of the flour. When the yeast has “bloomed” (becomes puffy) pour the yeast water in the well and pour the egg/olive oil mixture in the well. Gently stir the flour and wet ingredients to roughly combine. Then mix on a slow speed with the dough hook for about 5 minutes until silky.
Take out dough hook. Smooth a thin film of olive oil over top of dough. Flip dough so all sides have a thin film of olive oil. Cover top of bowl with a clean dry kitchen towel and place in a draft-free place to rise. Let rise about 2 hours. It should double in size. Scoop dough out onto a work surface and cut into 6 pieces (use a bench scraper or knife). Roll each piece gently into a ball and wrap each ball in a pam-sprayed or lightly oiled piece of plastic. Don’t wrap too tight since dough will rise again in plastic. Let rise about an hour more.
Make the sauce: Heat a little olive oil in a medium saucepan. Add the onion. Sauté until wilted and softened, about 3 minutes. Add the wine, let evaporate. Add tomatoes. Stir to combine. Season with salt & pepper. Simmer for 10 minutes. Remove from heat, let cool to room temperature.
Cut the cheese into small thin slivers. Preheat oven to 425 degrees F.
Unwrap dough and gently press out the dough. Using a rolling pin, roll out an thin oval. Just below the center of the oval smooth a few tablespoons of sauce, across the width of the dough, sprinkle some thin slices of provolone cheese, and a few torn basil leaves. Lift the bottom border of dough over the filling, add more sauce, cheese and basil. Fold over again, and repeat one more time. Pinch to seal all around. Place on a parchment-lined sheet pan and bake for about 30 or until golden. Let sit for a few minutes before cutting into 2-inch slices. Serve warm or at room temperature.
Ragusa Scaccia- Stuffed Pizza w Tomato & Cheese 4 pieces (from Ragusa)
For the dough:
3 cups semolina, fine ground, plus more for bench flour
1 teaspoon salt
1 tablespoon olive oil
1 package yeast (2 1/4 teaspoons)
1/2 cup warm water
For the filling:
1 small onion, peeled and diced
olive oil for sautéing
1/4 cup white wine
28 ounces crushed tomatoes
salt & pepper to taste
1 lb. provolone cheese, cut into 1-inch thin slices (or caciacavallo if you can find it)
1 cup basil leaves
Whisk flour and salt to combine. Drizzle olive oil on top. Mix yeast with warm water, wait 2-3 minutes until yeast blooms. Make a well in the center of the flour and pour in yeast water. Mix gently with your hands, moving the damp flour between your fingers. Add 2/3 to 3/4 cup more water. Mix until dough starts to form, then start kneading to bring it together. Knead until a smooth dough forms, about 5 minutes. Break into 4 pieces. Roll each into a ball. Place in a draft-free spot covered with a few layers of clean kitchen towels. Let rise 1 hour.
Make the sauce: Heat a little olive oil in a medium saucepan. Add the onion. Sauté until wilted and softened, about 3 minutes. Add the wine, let evaporate. Add tomatoes. Stir to combine. Season with salt & pepper. Simmer for 10 minutes. Remove from heat, let cool to room temperature.
Cut the cheese into small thin slivers. Preheat oven to 425 degrees F.
Roll out one of the dough balls as thin as possible. (less than a 1/8”) Spoon a thin layer of sauce in the center, across to the edges. Add some cheese pieces and a couple of basil leaves. Fold over the top to the center. Spoon little sauce on top and add a few pieces of cheese and a basil leaf. Fold over the other end and repeat. Fold 2 sides in and add sauce and cheese. Fold to close like a square package. Repeat with the rest of the dough. Place scaccia on a parchment lined baking pan. Bake for about 30-40 minutes until golden and charred in spots. Cut each scaccia into squares and slices. Serve.
3 small ripe tomatoes
1/2 cup almonds without the peel (whole or slivered)
2 garlic cloves, peeled & halved
1/2 cup fresh basil leaves AND MINT
1/4 cup grated pecorino cheese (plus more for serving at the table)
approximately 1/3 cup olive oil
salt & pepper to taste
1 lb. Fusilli or favorite cut pasta
Bring a medium saucepan, halfway full of water, to a boil. Cut out the stem mark from each tomato and cut a superficial “X” at the bottom of each tomato. Drop tomatoes into boiling water. Let sit for about 1-2 minutes. Lift out with a slotted spoon into a bowl. Run cool water over tomatoes. Drain.
Peel skin off of tomatoes. Cut them into quarters and push out the seeds from all the tomato quarters. Discard seeds and skins. Cut tomato quarters into about 3 pieces each. Place in a bowl and set aside.
Place the almonds and half of the garlic in the bowl of a mortar and pestle. Pound and press the almonds and garlic, breaking it down to small pieces and pulpy. As you work, add basil leaves a little at a time, pounding into the mixture. You want to get it finely mashed but small chunks are okay. Drizzle a little olive oil. Add the rest of the garlic and basil leaves, pound until broken down fine. (Alternatively, use a food processor. Don’t over-process…break it down so that you can still see tiny pieces of almond.)
Meanwhile, set a pasta pot of water on the heat to boil. When boiling, add a generous amount of salt. And add pasta. Stir until the water comes up to a boil again.
Scrape the pesto into your serving bowl. Add 1/4 cup of grated pecorino. Season with salt & pepper. Add a couple of spoonfuls of pasta water. Mix to combine. Add a drizzle of olive oil. Add the tomatoes. Press tomatoes slightly with a potato masher, leaving a lot of chunks, too.
When pasta is done, scoop a cupful of pasta water and reserve. Then drain pasta. Mix drained pasta with the pesto. Stir to coat and combine. Drizzle a little olive oil. Add a little pasta water if the mixture is dry. Serve, passing extra grated pecorino at the table.
Almond Cookies Dipped in Crushed Almonds w Candied Cherry (from Palermo)
2 cups almond flour
1 cup sugar
1/4 teaspoon orange or lemon extract
3 egg whites
1 cup sliced almonds, crushed (I put it in a ziplock bag and press with my fingers to crush)
1 dozen candied or maraschino cherries, quartered
Preheat oven to 400 degrees F.
In a medium mixing bowl, whisk together the almond flour and sugar, with a fork. Stir in the extract and egg whites and mix until a dough forms. Knead lightly to combine. Dough will be sticky. Place crushed almonds on a flat plate. Pull off a small amount of dough and roll into a 1-inch to 1&1/2-inch ball. Roll each ball in the crushed almonds, place on a parchment lined sheet pan, gently press a piece of quartered cherry on top of each. (makes about 1 dozen or so). Bake for about 12 minutes until golden.
Lamb ragu! I hope you’ll try this recipe. It’s so easy. Instead of braising chunks of lamb for a couple of hours, using ground lamb makes this a quick recipe. In just an hour you have a deeply flavored luscious dish of pasta! I used pappardelle here, but any shape can work very well.
The full recipe is below. I also demonstrated how to make the dish on Today in Nashville on WSMV-TV Channel 4 in Nashville. Check the link below.
Plus Pastene tomatoes, originally from the Boston area, are here in the Southeast and at Publix. I love to use the San Marzano DOP or the Kitchen-Ready Crushed Tomatoes. Both work great in this recipe.
Let me know how it goes!
Lamb Ragu
2 tablespoons olive oil
1 medium onion, small dice
1 carrot, peeled & cut into small dice
2 garlic cloves, peeled & smashed
1 lb. ground lamb (or beef, if you prefer)
1/4 teaspoon ground nutmeg
1/4 teaspoon ground cinnamon
1/3 cup dry white wine
1 28-oz can Pastene crushed tomatoes
1 28-oz can Pastene Whole San Marzano tomatoes
salt & pepper to taste
3-4 sprigs fresh mint
1 lb. pappardelle pasta, fusilli, or your favorite pasta
grated parmesan for individual servings
Equipment needs: large saucepan with lid, pasta pot for boiling pasta (with insert or use a colander), cutting board, knife, large serving bowl for pasta. We’ll be using the stovetop.
Heat the oil in a medium saucepan. Add the onion, carrot, and garlic. Cook on medium heat until onion softens, about 3-4 minutes. Add the meat. Brown meat, breaking up into smaller pieces, with some larger chunks (making for a rustic mixture of meat pieces). When the meat is not longer pink, add the cinnamon and nutmeg, stir in. Then add the wine. Let it sizzle and mostly evaporate. Add the tomatoes. Season with salt & pepper. Stir to combine. Simmer for 20-30 minutes, cover askew.
Place a pasta pot of water on the heat. When boiling, salt water. Add pasta. Cook until al dente (not too soft, but tender to the bite). Fresh pasta takes only 2-3 minutes. When done, drain. Add to a large serving bowl. Spoon some sauce and gently coat. You can add extra sauce on top of individual servings. And dust with some grated parmesan.
Take home full tins of cookies. And I’m making you lunch! 🙂 $85 includes all
OR
Via ZOOM on Tuesday December 19th at 5pm CENTRAL
I’ll send you the ingredient list. We’ll cook in our kitchens over Zoom and I’ll lead you step by step. You’ll have lots of Italian Cookies for your holidays! $35 per household
Contact me for info or to reserve at Info@ChefPaulette.net
You don’t want to miss this! Here’s the best holiday party of the season!
Brooklyn-Italian full buffet of pastas, meatballs, sausage, Italian vegetables, dessert (Sicilian Ice Cream Sandwiches and more).
Duette playing live: 1950’s-1960’s Pop Radio Classics. (Temptations, Shirelles, Platters, Johnny Mathis, Perry Como, Sonny & Cher, Righteous Brothers…)
Wines by Nashville Hippie Radio’s Grateful Ed (of Village Wines & Green Hills Wine Shoppe).
Here’s a way to have cheesecake fast! And easy. This batter makes a great 9-inch cheesecake, but by dividing the batter into cupcake papers, it cooks faster, and cools & chills faster, so it’s ready to eat within the hour.
It’s a no-crust cake, but you can add some cookie crumbles in the bottom of the cupcake papers, and on top of the finished cake, too. Using ricotta cheese makes a light and yummy little cake.
Let me know how it goes!
Mini Ricotta Cheesecakes
1 15-ounce container ricotta
1/2 cup sugar
1/2 teaspoon vanilla
2 eggs
1 to 1 1/2 cups Amaretti cookies or favorite cookie (any), crumbled
1/2 cup bittersweet chocolate chips
1/2 teaspoon instant espresso (optional)
1/3 cup heavy cream
Equipment needs: Large mixing bowl, whisk, medium cupcake tin plus 8-10 cupcake papers (alternatively, this will make a small 6-inch or 8-inch cheesecake), 1/3 cup measuring cup or ladle or large spoon. You’ll be using the oven.
Preheat oven to 350 degrees.
Line a medium cupcake tin with 8 cupcake papers. (some spots will be empty). Sprinkle a teaspoon, or more, of crumbled cookie in the bottom of each cupcake paper.
In a large bowl whisk together the ricotta and sugar until smooth, until you can’t feel/hear the grittiness of the sugar. Whisk in eggs one at a time until combined. Add vanilla and whisk in. Spoon batter into cupcakes papers, filling papers about 1/2 way or more.
Bake for about 20 minutes until the cake is set, the edges are golden, and a toothpick in the center comes out clean. Let cakes cool. Serve at room temp or chill for an hour, or overnight. Serve with more cookie crumbles on top and a drizzle of chocolate sauce.
Make the chocolate sauce: Melt the chocolate, cream, and instant espresso in a small heavy saucepan until combined and smooth.
I’m just back from Venice! Every time I bring a group of my cooking class participants (this is my 4th group trip) I come back with new recipes. Venice can make your head spin. So much to see. So many gorgeous views, moments, people, food…I’m ready for a year residency — at least!
But to narrow the field a bit, let’s concentrate today on the wonderful “cicchetti” you find at the “bacari” (wine bars). Little bites that go so well with your “ombra” of wine, or your apperitivo.
Sometimes these places are so small there’s only room outside, where you can mingle with other munchers, or sit on the ledge of a canal and enjoy your Venetian snack.
Here a few of my favorite cicchetti from this trip’s tastings. One fun one that I just love: tuna salad on a slice of baguette dusted with cocoa. Yes! It’s a yummy one.
Buon appetito!
Venetian Cicchetti
Tuna with Cocoa on Crostini
Mix 1 drained can of tuna with a touch of mayo, a drizzle of olive oil, and the juice of 1/2 lemon. Top bread, and dust lightly with unsweetened cocoa.
Salumi & Pickle on Crostini
Spread a thin layer of mustard or mayo on crostini slice. Scrunch up salumi slice (salami, soppresata, coppa), top with a thin slice of pickle, secure with a toothpick.
Mini Polpetti — Small Meatballs in Sauce with Parsley
1/2 pound ground beef
1 egg yolk
1 thin slice white bread, crusts removed, ripped & covered with milk
1/4 cup grated parmesan
1 TB minced parsley
Salt & pepper to taste
Mix all ingredients until smooth (remove bread from milk and add just wet bread to mixture.
Roll into tiny meatballs, Add to a parchment lined baking pan. Drizzle with olive oil. Add a rosemary sprig and a couple of garlic clove. Roast till cooked through. Coat lightly with your favorite sauce or condiment.
Add meatball with toothpick with a large parsley leaf.
Polenta Toast with Taleggio Cheese
Cook or buy ready made polenta. Add cooked polenta to an oiled sheet pan and spread into a 1/4-inch or 1/2-inc layer. Allow to cool. Cut into bite-sized squares. Fry squares in a little olive oil. Top squares with a slice of taleggio. Sprinkle with dried oregano and slivered roasted red pepper (store-bought).
Mortadella Cubes with Briny Pepper
Buy a thick slice of mortadella. Cut into bite-sized squares. Top with a bit-e-sized pice of pepper (like Greek Pepperonicno). Secure with a toothpick.
For crostini for all, select a baguette or thin Italian bread. Slice into 1/4-inch or 1/2-inch slices.
For cicchetti, we don’t need to toast the slices. Top with toppings. Serve.